Virt-manager: Difference between revisions
| (4 intermediate revisions by the same user not shown) | |||
| Line 43: | Line 43: | ||
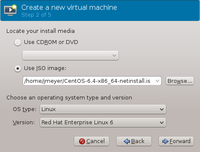
* Enter the local path to the [http://ftp-stud.fht-esslingen.de/pub/Mirrors/centos/6/isos/x86_64/CentOS-6.4-x86_64-netinstall.iso netinstall iso image] and choose the OS type and version.<br> |
* Enter the local path to the [http://ftp-stud.fht-esslingen.de/pub/Mirrors/centos/6/isos/x86_64/CentOS-6.4-x86_64-netinstall.iso netinstall iso image] and choose the OS type and version.<br> |
||
[[File:Virt-manager2.png|200px]] |
[[File:Virt-manager2.png|200px]] |
||
* Choose the memory and number of CPUs for your VM. |
|||
* Choose the size of your virtal hard disk: |
|||
[[File:Virt-manager3.png|200px]] |
|||
* Click Finish to create your image file and to boot the VM from the netinstall iso image. |
|||
* Follow the OS installation instructions |
|||
** CentOS installation method: URL |
|||
** Enable IPv4 support and get a dynamic or manual IP (depends on your network environment) |
|||
** Enter [http://ftp-stud.fht-esslingen.de/pub/Mirrors/centos/6/os/x86_64/ URL of CentOS packages]. |
|||
** It is recommanded to create a physical volume as last partition on the virtual dist, because this allows to extend the image size later. Example partition layout:<br> |
|||
-first partition: ext4, 2 GB, mount point /<br> |
|||
-second partition: lvm, free space<br> |
|||
-logical volumes: /usr, swap, /tmp, /home, /var |
|||
==Converting an Image== |
==Converting an Image== |
||
* Converting a raw image to qcow2: |
* Converting a raw image to qcow2: |
||
qemu-img convert -O qcow2 myraw.img myqcow2.qcow2 |
qemu-img convert -O qcow2 myraw.img myqcow2.qcow2 |
||
* Converting VirtualBox image to raw format: |
|||
VBoxManage clonehd --format RAW MyTestVM.vdi MyTestVM.raw |
|||
==Extending the Size of an Image== |
==Extending the Size of an Image== |
||
Stop the VM. The last partition inside the VM image needs to be a physical volume (PV). You can list the partitions with: |
|||
# virt-list-partitions -lh test.img |
|||
/dev/sda1 ext3 996.2M |
|||
/dev/sda2 ext3 2.4G |
|||
/dev/sda3 pv 588.3M |
|||
# ls -lh test.img |
|||
-rw-r--r-- 1 qemu qemu 4.0G Aug 9 12:27 test.img |
|||
Adding 1G: |
|||
truncate -s 5g testn.img |
|||
Copy old image to new one and state which partition should be extended: |
|||
virt-resize --expand /dev/sda3 test.img testn.img |
|||
Start the VM and resize the PV: |
|||
pvresize /dev/vda3 |
|||
==Mounting a KVM Image== |
==Mounting a KVM Image== |
||
Latest revision as of 14:42, 7 June 2013
UNDER CONSTRUCTION
A kvm image can be created on any linux system. The page describes how to install a kvm image using the virt-manager gui. Alternatively, the command line tool virsh could be used.
prerequeste
The following packages are needed:
- libvirt-daemon-kvm
- qemu-kvm
- virt-manager
It is recommanded to use a CPU with virtualization support:
egrep '^flags.*(vmx|svm)' /proc/cpuinfo
Make sure libvirtd is running:
/etc/init.d/libvirtd restart
Prepare a network bridge:
RedHat (CentOS, Fedora)
/etc/sysconfig/network-scripts/ifcfg-br0
DEVICE=br0
TYPE=Bridge
BOOTPROTO=dhcp
ONBOOT=yes
NM_CONTROLLED=no
/etc/sysconfig/network-scripts/ifcfg-eth0
DEVICE=eth0
HWADDR=00:11:22:33:44:55
ONBOOT=yes
NM_CONTROLLED=no
BRIDGE=br0
brctl addbr br0
brctl addif br0 eth0
brctl show
bridge name     bridge id               STP enabled     interfaces
br0             0080.000000000000       no              eth0
ifup br0
Note that the NetworkManager does not support bridges.
Ubuntu
Installation of Image
- Start virt-manager (as superuser) and click on 'Create a new virtual machine' button:
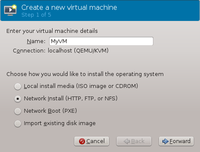
- Enter a name for your VM and choose the type of installation of the OS. This example will show how to install CentOS6 with an netinstall iso image. Choose Local install media and click forward.
- Enter the local path to the netinstall iso image and choose the OS type and version.
- Choose the memory and number of CPUs for your VM.
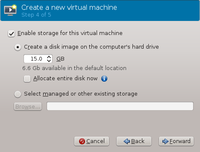
- Choose the size of your virtal hard disk:
- Click Finish to create your image file and to boot the VM from the netinstall iso image.
- Follow the OS installation instructions
- CentOS installation method: URL
- Enable IPv4 support and get a dynamic or manual IP (depends on your network environment)
- Enter URL of CentOS packages.
- It is recommanded to create a physical volume as last partition on the virtual dist, because this allows to extend the image size later. Example partition layout:
-first partition: ext4, 2 GB, mount point /
-second partition: lvm, free space
-logical volumes: /usr, swap, /tmp, /home, /var
Converting an Image
- Converting a raw image to qcow2:
qemu-img convert -O qcow2 myraw.img myqcow2.qcow2
- Converting VirtualBox image to raw format:
VBoxManage clonehd --format RAW MyTestVM.vdi MyTestVM.raw
Extending the Size of an Image
Stop the VM. The last partition inside the VM image needs to be a physical volume (PV). You can list the partitions with:
# virt-list-partitions -lh  test.img
/dev/sda1 ext3 996.2M
/dev/sda2 ext3 2.4G
/dev/sda3 pv 588.3M
# ls -lh test.img
-rw-r--r-- 1 qemu qemu 4.0G Aug  9 12:27 test.img
Adding 1G:
truncate -s 5g testn.img
Copy old image to new one and state which partition should be extended:
virt-resize --expand /dev/sda3 test.img testn.img
Start the VM and resize the PV:
pvresize /dev/vda3


